
You spent time crafting the perfect LinkedIn post. Found a great AI-generated image to go with it. Hit publish.
And then you notice it. A small "CR" badge in the corner of your image.
That's LinkedIn's Content Credentials label. It tells everyone scrolling through their feed that your image was AI-generated. Some people don't care. But if you're building a personal brand, running a company page, or just want your content to look clean, that badge is distracting.
Here's what it is, why it appears, and three ways to remove it before you post.
What is the CR badge?
CR stands for Content Credentials, a standard developed by the Coalition for Content Provenance and Authenticity (C2PA). It's a kind of digital watermark embedded in the metadata of AI-generated images.
When you export an image from ChatGPT, Gemini, Midjourney, or most major AI tools, that image carries metadata that says: this was made by AI. LinkedIn reads that metadata and automatically adds the CR badge to your post.
It's not a penalty. LinkedIn isn't punishing you for using AI. It's a transparency initiative. The platform wants audiences to know when content is AI-generated.
But the badge lives in the metadata, not in the image itself. Which means if you change the metadata or strip it, the badge disappears.
Why does it matter?
The CR badge changes how people perceive your content before they even read it.
Research consistently shows that audiences engage differently with content they know is AI-generated versus content they believe is human-created. The badge triggers that distinction immediately, before someone reads your headline, your hook, or your call to action.
For personal brand builders, founders, and marketers who use AI as a tool but still want their content to feel personal and intentional, the badge works against that goal.
None of the methods below involve deceiving anyone about the content itself. The text, the idea, the strategy, that's still yours. You're simply removing a metadata tag from an image file.
1. Run it through Canva or Figma
This is the cleanest method and takes about 30 seconds.
Download your AI-generated image from ChatGPT, Gemini, or whatever tool you use. Open Canva or Figma and create a new frame. Place the image inside. Export it as a new file.
When you export from Canva or Figma, the platform generates a new file with its own metadata, not the original AI metadata. The C2PA credentials are gone. Upload that file to LinkedIn and no CR badge appears.
You don't even need to make any design changes. The act of running it through a different tool is enough.

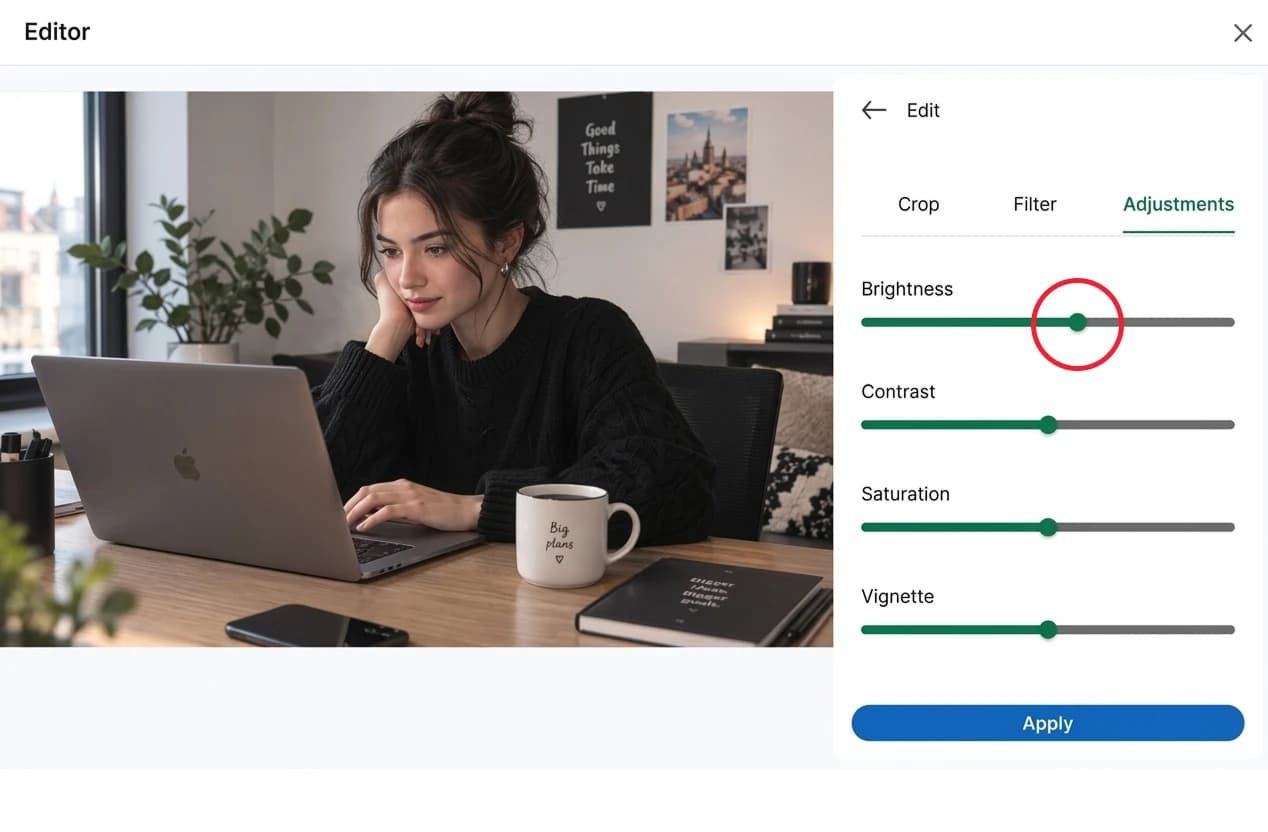
2. Adjust brightness by 1% in LinkedIn's own editor
LinkedIn has a built-in image editor that appears when you upload a photo to a post. Most people ignore it. But it's actually the fastest way to remove the CR badge without using any external tool.
Upload your AI image as usual. Before posting, open the image editor and increase the brightness by 1%. Just one percent. LinkedIn re-processes the image when you apply the edit and strips the original metadata.
The image looks identical. The CR badge doesn't appear.
This works because LinkedIn's editor generates a new version of the file when you apply any adjustment, and that new version doesn't carry the original AI metadata forward.
3. Take a screenshot
The simplest method of all.
Open your AI-generated image on screen. Take a screenshot. Post the screenshot.
When you screenshot an image, you're capturing pixels on your display, not copying the file's metadata. The resulting image file is a new PNG or JPG with no embedded AI credentials. LinkedIn has nothing to detect and adds no badge.
The tradeoff is image quality. Screenshots are slightly lower resolution than the original file. For most LinkedIn use cases this is unnoticeable, but if quality matters, use method one or two instead.
Which method should you use?
- If you have 30 seconds and Canva open: method one.
- If you're uploading directly to LinkedIn and want to skip extra steps: method two.
- If you need the fastest possible solution right now: method three.
All three work. All three take under a minute.
One more thing
If you're already using AI to generate images for LinkedIn, you're probably also switching between tools. One for writing, one for visuals, one for analytics.
LinkedRefs puts all of that in one place. Generate LinkedIn posts, create images and animations, track your profile analytics, and see what content actually performs without leaving the platform.
 ChatGPT
 Google
 Grok
Grok Claude
 Perplexity